Showing posts with label Internet Tips. Show all posts

How To Control Timeline And Tagging On Your Facebook Account


It is so annoying when you login on Facebook, check your notifications and see that you were tagged with 99 people and also people/friends commenting on a photo of i.e the photo you're been tagged.

What's next on your mind is how to untag yourself from that photo, try to control who tags you on Facebook and also what appears on your timeline.

Today I'll show you how to control timeline and tagging option on your Facebook account. Carefully follow the steps below:

How To Control Timeline And Tagging Option On Your Facebook Account
Download and install Facebook lite on your device. Input your username and password and login to your account.

Click on the menu button

Click on settings and when the next page opens, click on account settings.

Under the account settings, click on Timeline and Tagging.


When the next page opens, click on Review posts friends tag you in before the appear on your timeline? This will take you to On and Off  Button, hit On.


Go back to the previous page and click on Review tags people add to your own posts before the tags appear on Facebook? Hit the On button when the next page appears.

When next you login or when you are online and someone tags you, you'll get a notification that a friend tagged you and you need to review and approve it. It is now your duty to approve it on your timeline and also your duty to untag yourself.



MTN WowWeekend: How To Get 3.75GB Free Data


Recently, MTN introduced the "wow weekend" data plans for its subscribers. A plan that brings different surprises each week like the one of yesterday and today.

Also Read: MTN WowWeekend Terms And Conditions.

How To Activate It
According to MTN, once you subscribe for the 750MB for N500 data plan this weekend, you will be given free 3.75GB usable only this weekend while the remaining 750MB is usable till its expiring date.

To activate it, dial *131*103#

Dial *131*4# to view data bonus. Bonus Valid till Sunday 11:59pm.

MTN WowWeekend: How To Get 17.5GB Free Data


TGIF!! Recently, MTN introduced the "wow weekend" data plans for its subscribers. A plan that brings different surprises each week like the one for this week which is a whooping 17.5GB worth of data at the price of just N2000.

Also Read: MTN WowWeekend Terms And Conditions.

How To Activate It
According to MTN, once you subscribe for the 3.5GB for N2000 data plan in the weekend, you will be given free 17.5GB but 12GB out of the 17.5GB is usable only in the weekend (Saturday and Sunday) while the remaining 3.5GB is usable any day, any time within the one month period.

To activate it, dial *131*110#

Dial *131*4# to view data bonus. Bonus Valid till Sunday 11:59pm.


MTN WowWeekend Terms And Conditions.


TGIF!! Here's another chance for you to get free MTN wow weekend bonus. If you are still unaware of the on-going MTN wow weekend data bonus offer, this is another opportunity and awareness post for MTN subscribers to get free 100MB or 1GB free MTN data when they recharge from N200 and above. But before you get in, it is important to know the rules that qualify MTN subscribers for the MTN WowWeekend data bonus.

3 Important Things That Qualify You For MTN Free Wow Weekend Data Bonus
➡ The free MTN WowWeekend data bonus commences on Friday each week, i.e. to say that you can start getting your free weekend bonus when you start recharging from Friday (00:01AM) and the offer last through till Sunday (11:59PM)

➡ we noticed that most people that recharged with N500 MTN airtime and were expecting to get the free 1GB free data were only given 100MB and yes that is the right thing, because MTN said recharge above N500 to get free 1GB wow weekend data bonus and recharge from N200 to N500 to get 100MB free data.

In other words if you must get your free 1GB MTN wow weekend data bonus, you must load with N501 on a single recharge and/or above to get it. We all know that there is no single MTN voucher of N501, thereby you have to either recharge with a single voucher denomination of N750 or N1,5000 or if you must recharge with N501 or other random airtime denominations that are higher than that, then you must do so by recharging via mobile banking app, ATM VTU, or other MTN Airtime Top Up means available.

➡ MTN WowWeekend data bonus is not available on all MTN tariff plans; the MTN tariff plans that are eligible for this offer are MTN TruTalk, MTN XtraPro, MTN XtraSpecial, MTN Pulse, and MTN BetaTalk, while the other MTN tariff plans that do not qualify for the offer are MTN BIZ Plus, MTN BizClass and MTN Yellow LifePlus.

In conclusion, if you have to enjoy the free MTN WowWeekend data bonus, you must be on any of those qualified tariff plans and you must load with the appropriate amount of airtime on a single recharge from Friday to Sunday.

Top Wikipedia Tricks that will change the way you use it


Wiki in Hawaiian means ‘quick’ and this crowd sourced quick user edited encyclopedia is the biggest knowledge resource on earth today. When you search for anything on google, 70% chances are that you will land on a page of wikipedia. We use wikipedia everyday either by choice or via google unintentionally and it is truly democratic knowledge lane on internet. In this article, I'll show you things which you probably don’t know.

Use Wikipedia Nearby to find something about the place you are visiting or you recently shifted.
Copy and paste this link
https://en.wikipedia.org/wiki/Special:Nearby
in your browser to find articles around the current place. It will initially ask you to allow wiki to know your location. Confirm it and browse through the most important facts, places or important info around the place.


Use simple wikipedia for simpler version of the wikipedia articles
If you want to use a simpler version of the article just visit: http://simple.wikipedia.org
Also when browsing an article, you can just replace en with simple. You will get a much lucid article.


Download the article as a pdf to read later
Click on the download as pdf link and you will get a pdf version of the article in arranged fashion. You can easily read this downloaded book on your kindle or mobile device. If you wanna read the article later and even when offline, download those articles as pdf and save it in your device.


Download entire wikipedia and keep it on your PC for offline usage
You can download the whole wikipedia on your computer and can also use it even in the absence of internet. The file size is approximately 10GB. Click Here to download the entire wikipedia. You can also download Wiktionary , Wikiquote and other wiki project websites here.

Use wikipedia to enhance knowledge about events
You can search for a particular month in wikipedia to view the set of events in that particular month.


You can alternatively browse Wikipedia Current Events/Affairs Here

Use Wikipedia as a Translation Tool
If you are finding it difficult to get the translation of a word in a language. Just find that term on Wikipedia and then select the language from the left sidebar to know the translation.


Read Random Wikipedia Article
Copy and paste this link
https://en.wikipedia.org/wiki/Special:Random
to read a random article from Wikipedia. You can also set it as a homepage in your browser to read a random article from Wikipedia every time you open the browser.

Create a Book from Wikipedia combining important articles
You can easily create a book out of Wikipedia with cool index pages and structured content. To do this, follow the steps below:

⏩ Click on create a book link on left sidebar.


⏩ Click on start book creator Button.


On clicking start book creator Button you will go to the article where you previously were. Wait, there is a Book creator menu visible on the top of the article as shown in the image below.


⏩ If you want to add this article to your book, click on add this page to your book. If not, visit on any other article you want to add on your book. This Book creator menu will always be there on the top to let you add that page to the book. You can also click on suggest pages. On clicking this a related set of articles will come as a list so that you can add them in your book if you want.


⏩ Click on show Book to finalize the book.


How to Search Google Directly For mp3 Links


We download mp3 songs from internet and use those mp3 download websites but the only problem we face is that these sites are stuffed with pop up ads with big downloads banner written and the real download link is hidden somewhere which a rocket scientist can only find. In this article, I'm going to show you a simple way in which you can directly find the download links of that song without using their ad stuffed web page. Follow the steps below carefully:

➡ Suppose you have to download Officially Blind, go to google and type
intitle:index.of?mp3 officially blind
You can type the song you want to download.


➡ Open any search result page, you will get the download link for that song.

➡ Just right click on any of the link and save it to your computer.


Done!!!

How To Email Large Attachments


Many email servers won’t even accept emails with attachments over 10 MB in size. To send large files via email, you need to upload your email attachments to a file storage and sharing service. The email recipient will receive a link they can click to download the email attachment, allowing you to send gigabytes of attachments without clogging up inboxes and running into size limits. Today, I'll show you how to email large attachments.

Email Large Attachments Using Google Drive.
➡ Download Google Drive here
➡ Create a new message on Gmail. On the new compose window (pop up) click on the Drive icon to insert a file as attachment.


➡ The file selection window will open up. Here, you can choose a file that is already a part of your Google Drive’s space or you can choose to upload one to the same.


➡ When you are done and back on the compose window, you will see an inline attachment like the one shown in the image below.


➡ Click on Send button and the attachment will be delivered like any other. The only difference here is that you haven’t sent an independent copy of the file. The file is still in your cloud but has been made available to the recipients of the mail.

Another advantage of such a message is that the recipient will always have the latest copy of the file. So if you update the file you do not have to send it all over again.

NOTE: whenever you send a file from Drive that isn’t shared with everyone, you’ll be prompted with the option to change the file’s sharing settings without leaving your email. It’ll even work with Drive links pasted directly into emails.

Exercise some basic caution when using these services – encrypt any sensitive files (such as financial documents) before uploading them.

How To Encrypt Files Before Emailing Them [Windows]


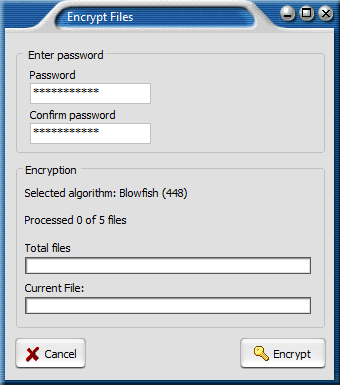
If you are ever faced with a situation where you feel your communications might be monitored, a somewhat simpler and easier approach would be to encrypt files to email them to the person you’re communicating with. If they know the password, then they’ll be able to decrypt and open those files. Today I'll show you the easiest way on how to encrypt files before emailing them.

Encrypt Files Before Emailing Them
➡ Download encrypt files Here.


➡ Select the files that you want to encrypt and click on “Encrypt”. You’ll be prompted for the password you want to use to encrypt those files.


➡ A new copy of that file will appear that is encrypted. You can tell the software to use one of 13 cryptography algorithms, and you can tell it to either leave, delete or shred the original files.

NOTE: The software will encrypt files or messages using a password you supply, and the recipient can use the software to decrypt that information.
.

How To Share One Post In Multiple Facebook Groups [One Click]


If you will debate with me that I can share my content through my own wall so let me remind you, Facebook allows only 5000 friends in a single ID. So everything is crystal clear, only groups are the best way to reach a big crowd of people.

You can join as many groups as you want. But the thing of consideration in this article is that you can't promote your content in groups one by one. It will cost you a lot of time. According to me no one have this much of time at present. So to help you I have found a trick using it you can share your post in multiple FB groups in just one click. You will be able to share your post, images in multiple Facebook groups at a time in a single click only.

You can join as many groups as you want. But the thing of consideration in this article is that you can't promote your content in groups one by one. It will cost you a lot of time. According to me no one have this much of time at present. So to help you I have found a trick using it you can share your post in multiple FB groups in just one click. You will be able to share your post, images in multiple Facebook groups at a time in a single click only.

You might not be aware about this thing that every FB group has an email address same as every profile on Facebook possess email address. The first work is to grab the email address of all the groups that you have joined.

How To Grab Email Address Of Facebook Groups
There are two methods to find email address of Facebook groups.
➡ Simply click on the 'About' tab of a group and then you can see the email address of that group on the top right hand corner of the page. However, most of the groups will be missing email address because the admin has removed the email address from being shown.

➡ This is the evergreen way to find the email address of a group. You can find it by looking at the URL in the address bar. Each group's URL is distinguished by either a name or a number.

Now follow the steps below:
➡ If you are able to find email address of a group in the about section then it's fine otherwise look at the address bar of your browser. You will see two types of URL there either the 1st one or the second one.
1. https://www.facebook.com/groups/username
2. https://www.facebook.com/groups/431732593680115/

➡ Copy the username or the group id like here it is 431732593680115.

➡ Now we will create email address of a Facebook group. Just paste username or group id before @groups.facebook.com. After that, your email address will look something like below.

username@groups.facebook.com
or
431732593680115@groups.facebook.com

➡ Use above steps to create email address for all the groups that you have joined, make a list of those emails by separating with commas.

➡ Now we need to compose an email, simple sign in your email address which you have used to create your FB account. (You can use Gmail, Yahoo or any other).

➡ Click on Compose E-mail.

➡ After that copy all the groups emails and paste them in the BCC field.

➡ After that add the desired material such as texts, images or links which you want share and click on Send button.

How To Add All Friends To Facebook Group By A Single Click


Facebook groups are best place for any discussion with your own choice friends or other members. No one from outside can interfere in group without admin permission means groups are totally different from pages. In pages every person is free to like page. Groups can be secret, closed or public. But the problem we face in groups is that, we have to add all member manually one
By one which is time consuming. Today I will show you how to add all members in Facebook group.We have an account with 5000 or less friends, so its not an easy task to add too many friends and you face difficulty while adding them one by one. so here is the simplest and easiest way which will help you to add all your friends to your Facebook group within few minutes by a single click.

Steps To Add All Friends To Facebook Group.
➡ Log in into that account whose friends you want to invite.

➡ open your Facebook Group in which you want to add friends.

➡ Click F12 button to open debugger and then select console box.

➡ Now copy script from below given button.

Get Script


➡ Copy the whole provided code and then paste them into console box.


➡ Press enter and the process will start sending invitations.

Note:- Don’t worry about anything because this script is totally safe. In case you have too many friends then you get blocked for using groups or even your account may get locked. So you have to be careful by adding only 600 friends per day.

If Facing any problem while following the steps, feel free to use the comment box below.

How To Crack Internet Download Manager(IDM) Permanently


⏩ Download IDM here or if you already have IDM installed, Update it by going to Help then click on check for Updates.If you don't wanna update your version, just click on Registration.

⏩ After clicking on registration, a new dialog window will appear asking for First Name, Last Name, Email Address and Serial Number.

⏩ Enter your name, last name, email address and Serial Key. Use any of the following Serial Keys below and click on OK to register:

RLDGN-OV9WU-5W589-6VZH1

HUDWE-UO689-6D27B-YM28M

UK3DV-E0MNW-MLQYX-GENA1

398ND-QNAGY-CMMZU-ZPI39

GZLJY-X50S3-0S20D-NFRF9

W3J5U-8U66N-D0B9M-54SLM

EC0Q6-QN7UH-5S3JB-YZMEK

UVQW0-X54FE-QW35Q-SNZF5

FJJTJ-J0FLF-QCVBK-A287M

⏩ After clicking OK, it will show an error message that you have registered IDM using fake serial key and IDM will exit.

⏩ Go to C:/ drive ➡ Windows ➡ System32 ➡ Drivers ➡ etc.

⏩ In the Etc folder you will see the hosts file. Right click on hosts file and go to its properties, then go to security tab and then select your admin account, just below you will see an edit button (in front of change permissions). Give the user full control and write and read rights and then click on apply and then click on Ok, now u will be able to edit the hosts file and save changes in it.


⏩ Open with Notepad and copy the below lines of code and add to hosts file:


127.0.0.1 tonec.com

127.0.0.1 www.tonec.com

127.0.0.1 registeridm.com

127.0.0.1 www.registeridm.com

127.0.0.1 secure.registeridm.com

127.0.0.1 internetdownloadmanager.com

127.0.0.1 www.internetdownloadmanager.com

127.0.0.1 secure.internetdownloadmanager.com

127.0.0.1 mirror.internetdownloadmanager.com

127.0.0.1 mirror2.internetdownloadmanager.com

⏩ After adding the codes above, save the notepad file and exit.

⏩ Start your Internet download manager to enable it convert to full version. When next you update your IDM, your registration will not expire.That means it will remain full version for life time and you can update it without any problem in future.


How To Use Airtel Cheap 2GB And 4GB 2g Network Data Plan On 3G Network


Today, we have found a way to optimize and use this data plan with 3G network. Just follow me as I explain the steps below:

How To Make The New Cheap Airtel Data Plan 2016 To Work On 3G
⏩ Your android phone must be rooted. Learn how to root any android device here

⏩ Download Script Manager here

⏩ Download turbo changer script 2G/3G here

⏩ Download the above apps and keep them safe before you start.

⏩ Now start the 3G/4G optimiser,choose network speed as 12/28/7 (set to max).

⏩ Select down speed increase. 

⏩ Apply the changes made above.

⏩ Restart the device once you save the changes.

⏩ Now open the script manager, browse the file which you downloaded i.e 3G turbo script text file changer.

⏩ Now grant the super user access permission(grant permission) or else you can click on the super user icon, grant permission and run the script.

⏩ Scroll up and set the settings to fastest to get the maximum data speed .

⏩ Now reboot your device finally.

⏩ Switch to WCDMA mode on settings (network).

NOTE:
⏩ Your phone must be rooted for this to work.

⏩ Reboot where ever it is required and you can finally enjoy the 3G speed on our 2gb data.


YouTube Tips You Need To Know


When visiting any video on Youtube replace Youtube with the following:

➡ Replace “youtube” with “listentoyoutube” in the URL and paste it in your address bar to download the audio of the video.

➡ Replace “youtube” with “ssyoutube” in the URL and paste it in your address bar to download the video in any quality available.

➡ Replace “youtube” with “nsfwyoutube” and paste it in your address bar to bypass age restriction.

➡ Replace “youtube” with “youtubeskip” in the URL and paste it in your address bar and you won’t see ads.

➡ Replace “youtube” with “listenonrepeat” in the URL and paste it in your address bar to repeat the video automatically.

➡ Replace “youtube” with “gifyoutube” in the URL and paste it in your address bar to convert video into gif format .

How To Peep Through Live Cameras Around The World


Go to google search engine, copy and paste any of the codes given below and peep through live cameras around the world:

➡ inurl:”CgiStart?page=”

➡ inurl:/view.shtml* intitle:”Live View / — AXIS

➡ inurl:view/view.shtml

➡ inurl:ViewerFrame?Mode=

➡ inurl:ViewerFrame?Mode=Refresh

➡ inurl:axis-cgi/jpg

FREE BROWSING ON ANDROID PHONES USING FREE BASICS BY FACEBOOK APP ON AIRTEL.


Free Basics Mobile Operators now available in Nigeria and Airtel network is the selected network for Nigerians to use and enjoy free browsing using Free Basics App. One good thing with Free Basics is you can be able to access any website that are available on Free Basics service.
Below are the list of some website you can access with Free Basics for free:

1. Facebook
2. Facebook messenger
3. matchup.ng
4. Vconnect
5. Bing
6. BBC News
7. Nigeria Galleria
8. pass.ng
9. Scholars4Dev
10. Goal.com
11. Free Books By Worldreader
12. Nairaland
13. Naij.com
14. OLX
15. Jobberman
16. ontouch.ng
17. Fact for life
18. Wikipedia and many more

How To Use Free Basics Free Browsing
Download and install Free Basics on your device, then turn on your airtel data and start browsing for free without any mb. You can download Free Basics Here

MTN, GLO, ETISALAT AND AIRTEL CONFIGURATION SETTINGS.


I decided to post these configuration settings because of the calls I receive a lot from friends asking about them. Below are the configuration settings:

MTN
Send SETTINGS to 3888 via SMS to receive automatic configuration from MTN.

Or set it manually as:
Account Name: MTN GPRS

IP Address: 10.199.212.2

Port: 8080

Username: web

Password: web

Access Point Name (APN): web.gprs.mtnnigeria.net

Note: The same configuration applies to GPRS and 3.5G.

GLO
Send PHONE MODEL to 927 e.g Nokia C5 to 927 via SMS to receive automatic configuration from Glo

Or set manually as:
Account Name: GLO

Homepage: http://www.gloworld.com

Username: flat

Password: flat

Access Point (APN): gloflat

IP or Proxy Address: 010.100.098.022

Port: 8080

ETISALAT
Send SETTINGS to 229 and automatically you will receive your configuration settings from Etisalat. After receiving the message save it and activate as default settings.

Manual configuration.
Account Name: ETISALAT

Homepage: http://www.etisalat.com.ng

Access Point: etisalat

IP: 010.071.170.005

Port: 8080

Username And Password: Leave it Empty.

AIRTEL
SMS Internet followed by Phone Make and Model to 232 e.g. SMS Internet Nokia 5230 to 232.

Manual configuration.
Account Name: AIRTEL

Homepage: http://wap.ng.airtel.com

Username: Internet

Password: Internet

Access Point (APN): internet.ng.airtel.com

IP or Proxy Address: 172.018.254.005

Port: 8080

Airtel Nigeria Introduces 2GB For N200 & 4GB for N500 Data Plans


Recently, Glo Nigeria introduced new cheap and affordable data plans and this had led to Airtel trying to join the competition. Airtel just introduces new cheap data plans for its new and existing users.
How to Subscribe for 2GB for N200 Data Plan?
The two data plans are released together and can be used on any device like smartphones, tablets, modems and any other device that support sim for internet connectivity. So are you interested in the new data plans? below is a guide on how to subscribe for anyone of the two.
➡ Dial *482# and you will be presented with the data plan menu.
Airtel data plans
2GB for N200
4GB for N500

➡ Reply with 1 which is N200/14 days/Unlimited

➡ You will receive a message that the subscription is successful once you have the required airtime.

NOTE: Alternatively, you can dial *482*1# to subscribe directly.

How to Subscribe for 4GB for N500 Data Plan
➡ Dial *482# and you will be presented with the data plan menu.
Airtel data plans
2GB for N200
4GB for N500

➡ Reply with 2 which is N500/28 days/ Unlimited

➡ You will receive a message that the subscription is successful once you have the required airtime.
NOTE: Alternatively, you can dial *482*2# to subscribe directly. 
To check your data balance, dial *141#.

Enjoy the new data plans while it lasts. Don’t forget to share to your loved ones. 

How To Unlock USB Modem Online


USB internet modems is the easiest method to connect to the internet. Most mobile telecommunication network providers usually lock their modems to a particular network making the flexibility that comes with USB internet modems impossible. The following are possible ways on how to Unlock a Modem online:
➡ Get your Modem and turn its Back to locate its IMEI Number. It usually starts with 35 e.g 352379420753520
➡ Write down the Number and make e.g Huawei or ZTE.

➡ Click

Here

for Huawei
and

Here

for Zte.

➡ You will see a Space for IMEI, Enter the Number at the Back of your Modem and then click on the Calculator Button

➡ Your code will be Provided to You e.g Unlock: 37651380 or NCK = 37653220

➡ Remove the SIM Card in your Modem and Insert another SIM Card that is different from the Network of the Modem. For instance, If the Modem is an Etisalat Modem, You will have to Insert an Airtel Sim or Glo into the Modem and Plug it to your PC.

➡ Wait for a minute and you'll see a pop up requesting for your Unlock Code

➡ Enter the Code you Generated from the Website e.g 37651380 and click on OK.

➡ Congratulation, Your Modem has been Unlocked and you can now Use it with any Network for Browsing!

Glo Cheapest Data Plan


Glo offers much more data volumes for much lesser prices and also provide a self care data management portal, the High Speed Internet (HSI) portal where you can view your data usage, share data, buy data and gift data, which is available at http://hsi.glo.com.

Dial *777# or visit hsi.glo.com to buy and manage subscriptions (Applicable to mobile devices Using the Glo Bolt Internet service).

Glo Plan Details


Daily Plans

Plan Name Price(N) Data Volume Validity SMS To 127 USSD Code
1day pack 50 30MB 1day 14 *127*14#
Instant Surf 100 100MB 1Day 51 *127*51#
Always Day 500 195MB 1Day 10 *127*3#
Smallie 200 200MB 3days 56 *127*56#

Weekly Plans

Plan Name Price(N) Data Volume Validity SMS To 127 USSD Code
1 Week 400 65MB 7 Days 52 *127*52#
Big Week 500 1GB 10 Days 57 *127*57#

Monthly Plans

Plan Name Price(N) Data Volume Validity SMS To 127 USSD Code
Always Micro 1,000 2GB 30 Days 53 *127*53#
My Phone 2,000 6GB 30 Days 55 *127*55#
So Special 2,500 10GB 30 Days 58 *127*58#
Always Macro 3,000 12GB 30 Days 54 *127*54#
N4,000 Data Plan 4,000 18GB 30 Days 59 *127*59#
Always Min 5,000 24GB 30 Days 11 *127*2#
Always Max 8,000 48GB 30 Days 12 *127*1#
Silver 10,000 11GB 30 Days 15 *127*11#
Gold 15,000 60GB 30 Days 16 *127*12#
Platinum 18,000 90GB 30 Days 17 *127*13#