Showing posts with label PC Tips. Show all posts

List of All 150+ CMD Commands For Your Windows


Command Prompt is one of the most powerful tools in Windows which is also known as CMD. CMD is the command-line interpreter on Windows operating systems. Command Prompt interacts with the user through a command-line interface. Things were not always like this; but with the advent of GUI-based operating systems, people started feeling that computing through command-based tools was boring. This ultimately leads the command prompt into obscurity.
However, the command prompt is not useless. In fact, it can be pretty useful. This article provides some excellent tricks, secrets, and hacks that will make you realize that the Windows Command Prompt is not only useful but also a tool that you should definitely give more respect to by knowing its cool cmd commands.

To Open CMD, you need to search for CMD in the Search box or you can simply press Windows Key + R that will eventually open the Run window, where you need to type CMD and hit enter.
1. Accessibility Controls – access.cpl
2. Accessibility Wizard – accwiz
3. Add Hardware Wizard – hdwwiz.cpl
4. Add/Remove Programs – appwiz.cpl
5. Administrative Tools – control admintools
6. Automatic Updates – wuaucpl.cpl
7. Bluetooth Transfer Wizard – fsquirt
8. Calculator – calc
9. Certificate Manager – certmgr.msc
10. Character Map – charmap
11. Check Disk Utility – chkdsk
12. Clipboard Viewer – clipbrd
13. Command Prompt – cmd
14. Component Services – dcomcnfg
15. Computer Management – compmgmt.msc
16. Control Panel – control
17. Date and Time Properties – timedate.cpl
18. DDE Shares – ddeshare
19. Device Manager – devmgmt.msc
20. Direct X Troubleshooter – dxdiag
21. Disk Cleanup Utility – cleanmgr
22. Disk Defragment – dfrg.msc
23. Disk Management – diskmgmt.msc
24. Disk Partition Manager – diskpart
25. Display Properties – control desktop
26. Display Properties – desk.cpl
27. Dr. Watson System Troubleshooting Utility – drwtsn32
28. Driver Verifier Utility – verifier
29. Event Viewer – eventvwr.msc
30. Files and Settings Transfer Tool – migwiz
31. File Signature Verification Tool – sigverif
32. Findfast – findfast.cpl
33. Firefox – firefox
34. Folders Properties – control folders
35. Fonts – control fonts
36. Fonts Folder – fonts
37. Free Cell Card Game – freecell
38. Game Controllers – joy.cpl
39. Group Policy Editor (for xp professional) – gpedit.msc
40. Hearts Card Game – mshearts
41. Help and Support – helpctr
42. HyperTerminal – hypertrm
43. Iexpress Wizard – iexpress
44. Indexing Service – ciadv.msc
45. Internet Connection Wizard – icwconn1
46. Internet Explorer – iexplore
47. Internet Properties – inetcpl.cpl
48. Keyboard Properties – control keyboard
49. Local Security Settings – secpol.msc
50. Local Users and Groups – lusrmgr.msc
51. Logs You Out Of Windows – logoff
52. Malicious Software Removal Tool – mrt
53. Microsoft Chat – winchat
54. Microsoft Movie Maker – moviemk
55. Microsoft Paint – mspaint
56. Microsoft Syncronization Tool – mobsync
57. Minesweeper Game – winmine
58. Mouse Properties – control mouse
59. Mouse Properties – main.cpl
60. Netmeeting – conf
61. Network Connections – control netconnections
62. Network Connections – ncpa.cpl
63. Network Setup Wizard – netsetup.cpl
64. Notepad – notepad
65. Object Packager – packager
66. ODBC Data Source Administrator – odbccp32.cpl
67. On Screen Keyboard – osk
68. Outlook Express – msimn
69. Paint – pbrush
70. Password Properties – password.cpl
71. Performance Monitor – perfmon.msc
72. Performance Monitor – perfmon
73. Phone and Modem Options – telephon.cpl
74. Phone Dialer – dialer
75. Pinball Game – pinball
76. Power Configuration – powercfg.cpl
77. Printers and Faxes – control printers
78. Printers Folder – printers
79. Regional Settings – intl.cpl
80. Registry Editor – regedit
81. Registry Editor – regedit32
82. Remote Access Phonebook – rasphone
83. Remote Desktop – mstsc
84. Removable Storage – ntmsmgr.msc
85. Removable Storage Operator Requests – ntmsoprq.msc
86. Resultant Set of Policy (for xp professional) – rsop.msc
87. Scanners and Cameras – sticpl.cpl
88. Scheduled Tasks – control schedtasks
89. Security Center – wscui.cpl
90. Services – services.msc
91. Shared Folders – fsmgmt.msc
92. Shuts Down Windows – shutdown
93. Sounds and Audio – mmsys.cpl
94. Spider Solitare Card Game – spider
95. SQL Client Configuration – cliconfg
96. System Configuration Editor – sysedit
97. System Configuration Utility – msconfig
98. System Information – msinfo32
99. System Properties – sysdm.cpl
100. Task Manager – taskmgr
101. TCP Tester – tcptest
102. Telnet Client – telnet
103. User Account Management – nusrmgr.cpl
104. Utility Manager – utilman
105. Windows Address Book – wab
106. Windows Address Book Import Utility – wabmig
107. Windows Explorer – explorer.
108. Managing the Boot Configuration Data – bcdedit
109. Editing Boot Settings – bootcfg
110. Encrypting or Decrypting Files/folders – cipher
111. Clearing the screen – cls
112. Managing stored usernames/passwords – cmdkey
113. Changing CMD Color – color
114. Compressing one or more files – compress
115. Converting FAT drives to NTFS – convert
116. Delete files – del
117. Deleting User Profiles – delprof
118. Displaying the list of files and folders – dir
119. Displaying Message On Screen – echo
120. Deleting one or more files – erase
121. Opening the windows Explorer – explorer
122. Formatting a disk – format
123. Knowing file extension – ftype
124. Displaying the Mac Address – getmac
125. Online help – help
126. Displaying the host name – hostname
127. Editing disc label – label
128. Log a user off – logoff
129. Get a log time in a file – logtime
130. Creating .cab files – makecab
131. Creating new folders- md
132. Opening Windows Installer – msiexec
133. Managing the network resources – net
134. Knowing the permissions for a user – perms
135. Testing a network connecting – ping
136. Printing a text file – print
137. Shutdown computer – psshutdown
138. Checking free disk space – freedisk
139. Know the file and volume utilities – fsutil
140. File transfer protocl – ftp
141. Showing the space used in folders – diskuse
142. Deleting a folder and all subfolders – deltree
143. Importing or Exporting Active directory data – csvde
144. Displaying the resultant set of Policy information – gpresult
145. Updating the Group policy settings – gpupdate
146. Replacing the files that are currently in use by the os – inuse
147. Comparing two files – fc
148. Finding a text string in a file – find
149. Finding for a strings in file – findstr
150. Displaying the memory usage – mem
151. Remote desktop protocol – mstsc
152. Managing the domain – netdom
NOTE: Always remember to run your CMD as administrator before using it.

How To Activate Windows 8.1 Enterprises/Any Edition[100% Working]


Windows 8.1 Activators can be found everywhere, almost in every tech blog too.
I've visited so many sites and found out that none of their cracks work even if you have the latest build of Windows 8.1. But this special KMSpico latest Activator I'm going to introduce to you is far different from all these activators. It works on Any windows 8.1 Edition Build and also this activator will not cause any evaluation warnings. Thanks to ELDI for developing this software(crack).

 This Activator can activate the following windows:

Windows 8 Any Edition / Bit Rate

Windows 8.1 Any Edition / Bit Rate

Windows 8.1 Update 1

Windows Vista Business/Enterprise

Windows 7 Professional/Enterprise

Office 2010/ Office 2013

Windows Server 2008/2008R2

Windows Server 2012/2012R2 (Server Standard, Data Center, Essentials)

Windows 10

How to Activate
If you have tried any other activator on your windows 8.1, etc, you must do a fresh re-installation of Windows 8.1 before using this activator otherwise the activation will not work. Anyways you can try it if you wanna.

Steps Involved

Disable any virus guards/Firewalls/Windows Smart Screen first.

Download and install KMSpico [Link2]

When the setup finishes it will stuck at the end.

Forget about setup and go to ‘C:\Program Files\KMSpico\’ folder

Now wait till Setup closes itself  (this will take some time)

Now open ‘KMSELDI.exe’ from folder

Click tokens backup button which is with an arrow facing down icon (click yes in next message box)

After that click Red button.

Wait till it says program completed ,activator will close itself ( if it freezes at some point,download and use the alternative KMS Activator we have given below)

That's all!

Check your Windows 8.1 computer properties for confirmation!!

Restart to remove if watermarks are still there.

NOTE: Do not Uninstall KMSpico from your system.

You can’t activate EVALUATION versions of windows 8.1 using this crack. Update to a final build and use the crack.

Fresh re-installation of Windows 8.1 is recommended before using this activator

You do not need an internet connection to use this crack.

You must have .net frame work 4.0  to run the activator.

This activation is permanent and it will be shown as 180 days but it renews at every boot.

This activation UPDATE COMPATIBLE. You can install any Windows update after activating.

If you have a genuine copy of Windows, this activator will not touch your license even if you press the Red Button.

Don't forget to share this post to your friends.

How To Make PC Display Normally Without Sleeping Itself


I got a message from a subscriber telling me that each time he uses his PC, after 20seconds, he has to make use of his mouse or touch-pad if not his PC will automatically go into sleep mode itself.

According to him, he tried fixing it using the battery power options by changing the Sleep Mode option but still to no avail.

Today I will be showing you how to make your PC display normally without sleeping itself.

HOW TO MAKE PC DISPLAY NORMALLY WITHOUT SLEEPING ITSELF?
I know you have tried the Battery Power Option several times but couldn’t fix your PC.

You’ve also tried all the options on your control panel, even using GodMode and also trying to fix your drivers too but to no avail.

You must be wondering what the cause to this problem might be. The problem is not from the battery Power options, neither is it from your drivers.

The main cause to this 20seconds blank display is from your Screensaver.

HOW TO FIX IT?
Go to your Screen saver settings

Check to see if your screen saver is set to Blank, if so, change it to None.
After that, click on apply and click ok to exist.

Comment if this solved your PC problem and also don’t forget to share this with friends.

How to Easily Remove Svchost.exe Virus from Your Computer


Svchost.exe is a non-malicious program required for windows and it’s a generic host process name for services that run from dynamic-link libraries (DLL).

A lot of computer users are finding it difficult to use their computer because of the malicious program called the Svchost.exe.

This malicious program is usually found in your C:\windows\ and the file is generally 20kbs. If you delete this file, you will be notified that it is in used and it can’t be deleted.

Good news!! I have been a victim to this so called Svchost.exe and it was hell for me while trying to use my PC. Due to this, I learned very quickly on how to fix this so called problem.

Today, I’ll be showing you how to easily remove Svchost.exe Virus from your computer.

How To Remove Svchost.exe Virus from Your Computer. 
Using Rkill:
 Download Rkill Here

Rkill is one of the most useful program, its work is to search for malicious programs, terminate them, and generate a list of the terminated processes.

All you need to do is to disable your anti-virus before running the program cos your anti-virus may try to keep it from doing its job due to what it does.

Download the program and run it. When it’s done scanning for malicious processes and terminating them, close the window and note the programs it stopped.

Using TDSSKiller:

 Download TDSSKiller Here


This is a program used in finding and deleting malicious rootkit.

All you need to do here is to download the file (it is in a .zip format), extract it and run the program on the infected computer.

When you run the program, leave all the options set to their default and click on scan, to scan for malicious files.

After scanning for malicious files, it takes care of the malicious files itself (i.e if there’s any).

After that, just leave the options for each of them as default and click continue.

NOTE: You need to reboot your system when it ask you to or if not, reboot it yourself so you can proceed to the next step.

Using aswMBR:
 Download aswMBR Here


After downloading the aswMBR, run it and click on the scan button. This will enable you to locate the possible rootkits.

It will create a file named MBR.dat on your desktop. Do not delete the file cos it’s a backup copy of your master boot file.

It may also find a malware called Alureon malware (known to steal usernames and passwords, including bank and credit card account information).

You are free to search it out, also ensure you can view hidden folders and delete the files at their possible locations.

Using MalwareBytes: Anti-Malware:

Download MalwareBytes Here. Make sure you install and update it.

After that, set it to full scan so it can scan your PC fully.

NOTE: This may take few hours and the active protection is only usable by premium members.

ESET Online Scanner:
Download ESET Online scanner Here

If it should ask you to install the program on your computer, be it via internet explorer or any other browser, go ahead and do so, following the necessary prompts.

Go to scan, under scan settings, check Scan archives and also check Remove Found Threats.

Click Advanced Settings and then select the following:

⏩ Scan potentially unwanted applications

⏩ Scan for potentially unsafe applications and also


⏩ Enable Anti-Stealth technology.


It will download, update itself and start scanning your computer.

Fix It:
The last thing you need to do which is necessary is to ensure that your computer’s Host file is repaired because it is usually damaged by the Svchost.exe.

All you need to do here is to click the Fix It button and then follow the prompts.

Done!! Your computer should be clean now.

Don’t forget to use the comment box and also share this to your friends if this tutorial worked for you.

How To Increase Internal Storage/SD Card Capacity


Right from the start of experience of gadgets, one of the beauty and important of a gadget is its ability to store data and information. Data can be store either in an Internal Storage or External Storage (CD, DVD, Cloud Storage). I'll be giving tips on how to increase the storage capacity of your internal/external storage:
All storing device has a limit e.g 1GB, 2GB, etc and those limits cannot be exceeded unless some tweaks that I will not be discussing in this posts are applied. Here are just simple tricks to increase your storage:

I suggest you should read this: How to free your ANDROID mobile space

Clear Your cache:
A Cache is a small and very fast temporary storage memory. It is designed to speed up the transfer of data and instructions. It is located inside or close to the CPU chip. It is faster than RAM and the data/instructions that are most recently or most frequently used by CPU are stored in cache. 

Uninstall unwanted and unused applications, files and folders so as to free up space 

Switch to cloud storage e.g Google Drive 

Try clearing your browser history or deleting outdated contacts, completed reminders, old notes or text messages.

Author: Iyanu Victor


PC Preventive/Corrective Maintenance


Preventive maintenance is the measure taken to prevent upcoming or to stop upcoming problem that will happen to your system (PC).

Measures Taken To Prevent Upcoming Problem In your System
Deleting unwanted files and programs.
➡ Uninstalling unwanted programs.
➡ Emptying your recycle bin.
➡ Backing up files.
➡ Dust regularly.
➡ Defragmentation:
     De-fragmentation is a process used in bringing back scattered files found in the hard disk back to its normal position.
How To Defragment Your Hard Disk
Click on your start menu.
Type Defrag and click enter.

A pop up will appear, click on analyze.

➡ After analyzing, there will be a result indicating the total free space, used space, and scattered files.
Click on De-fragment.
NOTE: It takes a lot of time for system to De-fragment

➡ Update anti-virus.

Corrective Maintenance
This is a kind of problem that occur due to improper preventive maintenance that will need to be resolved. It could be resolved through trouble shooting.

Steps In Trouble Shooting
Understand the problem.
➡ Understand the possible causes.
➡ List out the possible solutions.
➡ Implement the solutions.
➡ Test.
➡ Document.
    The best and easier way to trouble shoot a system is through internet. Firstly, you need to understand the problem, compose it to google, locate forums where such problems had been complained and solved. Try most of the steps and if any of them solve it, document.

Download Microsoft .NET Framework 3.5 Offline Installer for Windows 8


Microsoft's latest OS Windows 8 comes with version 4.5 of .NET Framework which is required to run software programs developed using the same version of .NET. But there is one slight problem! Most of the existing software require version 3.5 of .NET Framework installed to be able to run. When you try to install .NET Framework 3.5 in Windows 8, it asks you to connect to Internet to download required installation files.

For people who don't have Internet connection or who don't want to waste their Internet connection bandwidth in downloading .NET Framework 3.5 files from Internet, we shared a tutorial in past to install .NET Framework 3.5 offline in Windows 8 without Internet connection:

How to Install Microsoft .NET Framework 3.5 Offline in Windows 8 without Internet Connection?

The method mentioned in the above article works fine in all editions of Windows 8 but sometimes a few people face problems while installing .NET Framework 3.5 offline. Some people get error messages while executing the command. Most of the times these problems occur due to incorrect syntax in command or due to insufficient permissions.

To solve all these problems today in this article, we are going to share a free, small and portable tool for all Windows 8 users. This small utility has been developed by AskVG reader "Cedric Poottaren".

"Microsoft .NET Framework 3.5 Offline Installer" is a freeware created for Windows 8 which helps you in installing .NET Framework 3.5 in your system without any need of Internet connection.


You just need to insert your Windows 8 setup disc in your CD/DVD drive and then select the correct drive letter in the freeware and then click on "Start Installation" button. That's it. It'll automatically execute the required command and will install .NET Framework 3.5 in Windows 8.

If you don't have Windows 8 setup disc or if you don't want to install .NET Framework 3.5 from setup disc, you can use the setup folder of Windows 8 present on your hard drive. For example, if you copied Windows 8 setup files in E:\ drive of your hard disk, you can click on "Browse" button given in the freeware and then go to the Windows 8 setup folder. Select "sxs" folder present under "sources" folder and then click on "Install" button to install .NET Framework 3.5 in your system.

This small piece of software also provides debugging options for advanced users. You can go to "Configuration" tab and enable the option to show installation process. It'll help you in finding the culprit in case you face any problem while installing .NET Framework 3.5 in Windows 8.

This software will work in both 32-bit (x86) and 64-bit (x64) editions of Windows 8. You'll need to run the software with Administrator privileges by right-click on the program icon and select "Run as Administrator" option. Its required because the method only works if the user has Administrator privileges.

You can download the software using following link:

Download Microsoft .NET Framework 3.5 Offline Installer for Windows 8

Feel free to share your feedback and suggestions on the comment box below.

Source: AskVg

How To Adjust Computer Screen Brightness Automatically by Time of the Day


As we all know that most of the youngsters use their computers or laptops at night. If you are one of them who tend to use the computer until late night then your eyes may go rough and you will end up suffering eye-related disease. So it’s always better to adjust them according to the light around you. So here we have a solution that will automatically change the screen brightness according to the time of day and even according to the location too. So have a look at the complete guide discussed below to proceed.

How To Adjust Computer Screen Brightness Automatically by Time of the Day
The method is very simple and depends on a cool software which can be used to set the time periods to alter the screen brightness easily. You just have to follow the below steps to proceed.

Features Of F.lux Software:-
➡ This tool makes you sleep better and protect your eyes from the bright screen.

➡ This app changes screen brightness best according to the room light like in sun time screen brightness will be maximum and at the night it will be reduced accordingly.

➡ In this app, you can setup settings according to your GPS location like in particular GPS location the brightness level will set accordingly.

➡ You can also set up the color sensitive work environment on your PC screen.

➡ You can also control the transition of your screen brightness in the transition speed settings: fast or slow.

Steps To Configure The F.lux Application In Your PC
You can also set the movie mode and some other mode in this tool for the best result.
➡ First of all download and install the f.lux software in your PC. After installation launch it on your PC.


➡ It will automatically detect the time and geographical location and will best set your screen color now.


➡ Untick the Disable for one hour option if you want to do color sensitive work.


➡ You can Adjust the Lightning for day and night in the tool Settings.


➡ You can also set the movie mode and some other mode in this tool for the best outcome.


Boom!! You're done!! Now your PC will adjust its brightness and color automatically according to time and geographic location and will protect your eyes. Use this cool tool and protect your eyes from the UV rays coming from the screen of your PC.

Hope you like this? Do share this tip with others by clicking on the share button.

How To Find And Remove Duplicate Files In Windows/Mac PC


Unless you’re ultra-scrupulous in the way you use your PC, there’s every chance that it contains duplicate data. It’s all too easy to copy a file twice from a USB flash drive or digital camera, or open one and inadvertently save it under a different name without making any changes.

Multiple copies of multiple files not only wastes disk space (though that’s hardly an issue these days), but it also makes file management difficult. After all, how can you be sure which photo of your aunt Freda is the best one to print when you have seven copies of it?

The solution is to perform a duplicate file search on your PC and delete the unwanted copies, The catch is that you can’t just do this by file name — you need to examine the contents, too. Doing that manually takes far too long, but you can automate the process. Here’s how.

How To Find And Remove Duplicate Files From PC.
Method 1: Using Duplicate Cleaner.
Duplicate cleaner is a popular tool for finding and removing Duplicate files and is available for both Windows and MAC. It is available for Windows XP, Vista, Widows 7, 8, 10. It provides easy to use interface with attractive look. It can compare Duplicate files for Music, images, videos, text etc. It also provides Duplicate directories with same name. We can tick which directories we want to keep or not. We can also make our search smaller by giving the type of files which we want to compare. We can also compare files by date also. It also compare files byte by byte and also we can compare files by name. It is an all in one solution for duplicate files. You can download this tool by clicking the button below:


Method 2: Using Dupeguru.
Dupeguru is an open source tool for comparing Duplicate files. It is available in three different edition i.e dupeguru music, picture edition. Dupeguru edition can find identical files only for music, text, images etc. But dupeguru music edition can find similar music file at different bit rate. Dupeguru picture edition can find the similar images even they are of different size, re-size, crop etc. It is an easy to use software. It is freely available for users. You can download and install this tool by clicking on the button below:

download-button


Method 3: Using Easy Duplicate Finder (For Windows, MAC ).
Easy Duplicate file finder is one of the best tools for finding and also to remove duplicate files in windows and mac. It is available for both Windows and MAC operating system. It has ability to compare Duplicate mp3, images, text, software, emails, videos files. It can free your hard disk space in Giga Bytes by removing Duplicate files. It require only 128 MB RAM, 5 MB space for its installation. It provides drag and drop capabilities for comparing files. It compare files byte by byte to find Duplicate files. It provide 100 % accuracy. We can compare files, folder and also hard drives for duplicate files. It is easy to operate and steps is almost similar like steps given above. You can download this tool by clicking on the button below:

download-button


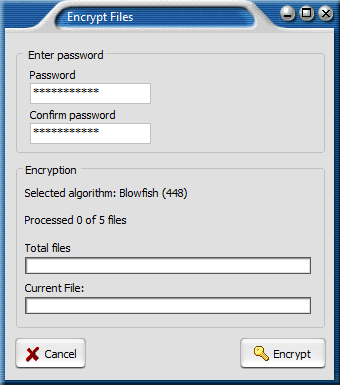
How To Encrypt Files Before Emailing Them [Windows]


If you are ever faced with a situation where you feel your communications might be monitored, a somewhat simpler and easier approach would be to encrypt files to email them to the person you’re communicating with. If they know the password, then they’ll be able to decrypt and open those files. Today I'll show you the easiest way on how to encrypt files before emailing them.

Encrypt Files Before Emailing Them
➡ Download encrypt files Here.


➡ Select the files that you want to encrypt and click on “Encrypt”. You’ll be prompted for the password you want to use to encrypt those files.


➡ A new copy of that file will appear that is encrypted. You can tell the software to use one of 13 cryptography algorithms, and you can tell it to either leave, delete or shred the original files.

NOTE: The software will encrypt files or messages using a password you supply, and the recipient can use the software to decrypt that information.
.

How to Check Original Installation Date of Windows


We all want to know when our windows was First Installed, how many months or years have passed since you are chugging without Refreshing your System. The Process to know the Original Installation Date of your Windows is Very Quick and Simple, Stay cool as I show you the Steps on how to do it.

Steps to Check Original Installation Date of Windows
➡ Hold Windows key and Press R key to open Run (WIN + R), Type CMD and hit enter to Open up Command Prompt.

➡ Type systeminfo.exe in Command Prompt and Hit Enter.

➡ Just wait a few Seconds to gather all the data.After that, you will get all the info of your System in just a few seconds including the Original Installation Date which we are looking for.


➡ With this Command you get all the Necessary info about your System but if you want to know the date on which your windows was Installed on your System then type this Command systeminfo | find /i “install date


How to Enable Hibernate In Windows 8


Hibernation is powering down a computer while retaining its state. Upon hibernation, the computer saves the contents of its random access memory (RAM) to a hard disk or other non-volatile storage. Upon resumption, the computer is exactly as it was upon entering hibernation. When used to save power, hibernation is similar to sleep mode and saves more power at the cost of slower resumption.

Steps To Enable Hibernate In Windows 8
Hibernate Option is Actually Hidden in Windows 8, We Can easily Unhide it and Enable it with the following steps:

➡ Press Win + W key ie: Windows key and “W” key to open up Setting search menu. Then Type “Power” , Windows will Show you Few Results, You have to Click on “Power Option”

➡ Now From the Left Pane, Click on Choose What the Power Button do.

➡ Click on Change Settings that are currently Unavailable.

➡ Scroll Down to “Shutdown Settings” Section and Check Hibernate box to Enable it and Click on Save Changes.


➡ Next time whenever you need to Hibernate your PC, just Move your Mouse pointer to right corner of your screen to Show up Charm screen, Click on SettingPower.


How To Create Windows 8 Bootable USB


There are of ways installing an operating system to your computer. Most of the people do it by using bootable CD/DVD of windows. But we really don’t need to install windows very frequently and because of this , it is so difficult to put this bootable disc on safe place and remember where you have kept it when needed. Here are steps to make Windows 8 Bootable USB.

Also , number of times when you are installing window you see some error saying that some of the necessary installation file is missing from the disc and setup can not be continued. All this happens because of scratches present on disc surface since disc is too old to use.

Apart from all these , Not all Computers have working CD or DVD Drives. This creates a big issue for those who want to install operating system via Disc method,So today I will show you an easy tutorial to Create Windows 8 Bootable USB .

How to Create Windows 8 Bootable USB
I assume that you already have ISO image of Windows 8 or 7 of which you want to Create Bootable Pendrive.

➡ Download Windows 7 USB/DVD download tool and install it.
This tool is available for free from Microsoft Corporation as well so you can get it from there too. Despite its name, this tool works with Windows 8 ISOs as well. You can use this tool for any version of Windows.

➡ After downloading and installing the tool, Run it. Now you need to Browse and give the path where the ISO file is located in your computer.

➡ Select whether you want to create a bootable DVD for windows or you want it to be a bootable pendrive. Here you need to select USB device because you want to make bootable pendrive.

➡ Browse and select the pendrive which you want to make bootable. Make sure that the pendrive has atleast 4GB free . Now click on Begin Copying.

➡ Once you begin copying , the tool will start creating bootable Windows 8 USB installer flash drive using the Windows 8 ISO. Allow the process to complete.

➡ When you see the message “Bootable USB Device created successfully”, you can restart your PC and boot from the USB drive.

Notepad Tricks Ghost keyboard Typing


People Use notepad to type and save some important or regular information, But very less people know that there is much more that we can do with Notepad. Today I've got one most interesting notepad trick to offer you all. It is called "Ghost Keyboard Typing". The idea behind this trick is quiet simple; notepad starts typing automatically whatever we want. Interesting right? You can use this to prank your friends or to amaze them with your technical skills. Now you might be thinking it as one of the toughest task made for only tech geeks. Then wait let me tell you the truth, you're completely wrong friend.
No technical skills are required to use this wonderful trick. You can easily implement it even if you're familiar with only Notepad. Just follow the guide written in simplified steps.

Key Point: - You don't even need to touch your keyboard and words are written in notepad on their own.

How To Type Automatically In Notepad

➡ Navigate to your desktop, right click on it and create a new text document (Or simply open notepad and create a new file).

➡ Copy and paste the following piece of code into it.

set wshshell = wscript.CreateObject("wScript.Shell")
wshshell.run "Notepad"
wscript.sleep 400
wshshell.sendkeys "N"
wscript.sleep 100
wshshell.sendkeys "O"
wscript.sleep 120
wshshell.sendkeys "T"
wscript.sleep 200
wshshell.sendkeys "E"
wscript.sleep 100
wshshell.sendkeys "P"
wscript.sleep 140
wshshell.sendkeys "A"
wscript.sleep 100
wshshell.sendkeys "D"
wscript.sleep 50
wshshell.sendkeys "T"
wscript.sleep 100
wshshell.sendkeys "R"
wscript.sleep 120
wshshell.sendkeys "I"
wscript.sleep 170
wshshell.sendkeys "C"
wscript.sleep 100
wshshell.sendkeys "K"
wscript.sleep 50
wshshell.sendkeys "S"
wscript.sleep 120

➡ Then go to File ➡ Save and select Save as type to all from drop down list.

➡ Name it as anything.vbs (Remember file extension should be .vbs only).
➡ Run it and see the magic.

NOTE: While Double Clicking on the saved file if you see an error box like ” line 1 ” and “Char 37” don't worry, right click on notepadtricks.vbs and click on edit, delete all Double quotations ie: ” and Type them all manually from your keyboard, save it and now you will have no errors.


How to Enable Copy And paste in Windows CMD


By Default Windows do not allow users to Copy text and Paste it in Command prompt Or Copy text from Command prompt and paste it elsewhere. But there is an option in CMD itself to enable Copy & Paste Text in Windows Command Prompt.

Today in this tutorial we will learn how to Enable Copying and Pasting Texts in Windows Command prompt. One of the main advantage of this will be that you can copy any command that you find on the internet or from any word/excel file and paste it directly in CMD and execute that command just like that.

How to Enable Copy Paste in CMD
➡ Open CMD, Just type CMD in search or Press Win + X key to select Command Prompt.

➡ Right Click on the Title of the CMD window and Select Properties just like its shown in the image below.


➡ You will see a Pop up Window coming up, Now on the Right hand side, Under Edit Options, Just Check Quick Edit Mode and click OK

➡ Everything is Done, Now just Copy any Text from Here or Anywhere else Using CTRL + C keys and just Right click using your mouse on CMD. You will see that the text is been pasted automatically in CMD.

NOTE: Please Understand that Using CTRL + C to Copy text is Important. Likewise if you wish to Copy Text from CMD to paste elsewhere then Just Select the Text in CMD and Again just Right Click with the mouse. Your Text is Copied and ready to Paste it in any Document you want.

This Doesn’t Limit you to just Text you can even copy File or Folder path and paste it in CMD. Everything that you have to type manually can be copied from somewhere and pasted directly to CMD with this small Tweak.

How to Remove Write Protection From USB Pendrive (3 Ways)


Pendrive is a very tiny gadget manufactured to store huge amounts of data. Invention of Pendrive revolutionized the way we transferred data. Now we do not need to carry all those fragile CD’s and DVDs with us. Just plug-in Pendrive and you got everything you need. As we can easily make bootable usb for OS installation. But pendrive manufacturers keep on improvising their products and thus they introduces write protection in Pendrives. Write protection is a setting that blocks any sort of modification or deletion of a file. Even there are other possible ways to protect usb with password but this is an ideal feature to secure data on USB but sometime it malfunctions and we are not able to remove write protection from usb pendrive and also not able to delete or copy a file or format the USB even when write Protection is switched off.

How To Remove Write Protection From USB Pendrive/SD Card?

Method 1:-
Remove Write Protection From Pendrive Using Regedit.

Registry Editor is a collection of resource for Windows OS. We can easily edit, update and remove settings for any particular file, device and windows system. So we can also use registry editor to remove write protection from usb drive. To remove the write protection from your SD card or Pendrive, follow the steps below:

➡ Open your “Start menu“, and search for “Run” option.

➡ Then type in “regedit” into run box and press Enter.


➡ After that new window for registry editor will pop up.

➡ Navigate through the following path:-

HKEY_LOCAL_MACHINE > SYSTEM> CurrentControlSet > Control >S torageDevicePolicies


➡ After successfully reaching to that portion as shown above. Double-click the “WriteProtect” key located in the right side pane and set the value to 0.

➡ Go to the Data Value box and press “OK

➡ To finish the process, safely remove the Pendrive, restart your computer and Plug-in pendrive again.

Method 2:-
Remove Write Protection From USB Drive Using Command Prompt.

In case you were not able to fix write protection error from pendrive by using the first method, then I suggest you try command prompt. CMD is basically used for various purpose and one of its purpose is to fix write protection error.

➡ Click On “Start Button” ➡ Then Search “CMD” ➡ Then Click Enter to open command prompt window OR click on Win + R to open CMD.

➡ Type “diskpart” and press enter and another window will appear.

➡ Type “list volume” and press Enter. This command will display a list of drives connected to your computer.


➡ Search for your pendrive by the letter that follows its name.

➡ Type select volume x. Replace x with the number from the first column in the list for the USB drive or SD card you want to perform commands for.

➡ For example, if the USB drive is Volume 3, you’d type select volume 3.

➡ Type “attributes disk clear readonly” and press enter.

➡ Type “exit“ and press enter.


Now you should remove the drive and re-insert it and hope this method will fixed issue.

Method 3:-
Remove Write Protection From Pendrive By Formatting

If none of the methods above have worked, try formatting your pendrive in safe mode.

➡ Restart your computer and press the “F8” key. Select Safe Mode with networking from the list that follows.

➡ Open the “My Computer (File Explorer)” window by pressing “Win + E” key.

➡ Right click on your drive and click on “Format”.

➡ Select “FAT32” from the “File system” menu.

➡ Uncheck “Quick Format” option.

➡ Click on “Start” button. Windows will Start to Format the drive.


How To Fix DLL File Missing Error In Windows


Dynamic Link Libraries(dll files) is an extension file that cannot execute like other extention files(e.g .exe files). Windows load these files automatically whenever it needs them and it has different .dll files for different tasks. Most of the time whenever we install an application on Windows OS e.g game, software, or any other .exe file, the problem does not begin when we run the setup of that application. Mostly it will arise even after when setup says that installation has completed successfully. When we try opening the application we just installed, we see an error that says ****.dll file is missing, try to reinstall the application. In that case, we have to find and fix dll file missing error in windows product by adding the missing .dll file to make the app work. I'll guide you through the steps on how to fix .DLL missing file error. 

Method 1
How To Fix DLL File Missing Error By Using DLL File Fixer: 
➡ Download DLL File Fixer here 

➡ Type in the name of the missing .dll file in the search bar then click on search button.

➡ Select that dll file and click on fix button.

➡ The DLL File Fixer app will install that dll file on your system and notify you when the procedure is complete.

➡ Try opening that file again which earlier showed the error of missing .dll file. It will run without any problem.

Method 2
Using DLL Suite To Fix dll File Missing Error:
DLL Suite is another application used in fixing missing dll errors.

Steps Involved

➡ Download the Dll suite application here.

➡ It will automatically search for .dll file errors.

➡ You can stop the search and manually enter the name of the missing .dll file in the download dll menu.

➡ DLL Suite will search for typed file and fix the errors.

Method 3
Using Systweeks Library To Fix DLL File Missing Error:
This is another way of finding and fixing dll missing error. In case you were not able to solve dll problem with the above given methods, you can also try this method.

➡ Click here and search for the missing .dll file from the alphabetically sorted list of all the .dll files. Just click on the name of the missing .dll file and it will take you further to download a program which will scan for all the registry errors and missing dll files on your system.These are best possible ways to fix dll file missing error in windows, software, games.

How To Crack Internet Download Manager(IDM) Permanently


⏩ Download IDM here or if you already have IDM installed, Update it by going to Help then click on check for Updates.If you don't wanna update your version, just click on Registration.

⏩ After clicking on registration, a new dialog window will appear asking for First Name, Last Name, Email Address and Serial Number.

⏩ Enter your name, last name, email address and Serial Key. Use any of the following Serial Keys below and click on OK to register:

RLDGN-OV9WU-5W589-6VZH1

HUDWE-UO689-6D27B-YM28M

UK3DV-E0MNW-MLQYX-GENA1

398ND-QNAGY-CMMZU-ZPI39

GZLJY-X50S3-0S20D-NFRF9

W3J5U-8U66N-D0B9M-54SLM

EC0Q6-QN7UH-5S3JB-YZMEK

UVQW0-X54FE-QW35Q-SNZF5

FJJTJ-J0FLF-QCVBK-A287M

⏩ After clicking OK, it will show an error message that you have registered IDM using fake serial key and IDM will exit.

⏩ Go to C:/ drive ➡ Windows ➡ System32 ➡ Drivers ➡ etc.

⏩ In the Etc folder you will see the hosts file. Right click on hosts file and go to its properties, then go to security tab and then select your admin account, just below you will see an edit button (in front of change permissions). Give the user full control and write and read rights and then click on apply and then click on Ok, now u will be able to edit the hosts file and save changes in it.


⏩ Open with Notepad and copy the below lines of code and add to hosts file:


127.0.0.1 tonec.com

127.0.0.1 www.tonec.com

127.0.0.1 registeridm.com

127.0.0.1 www.registeridm.com

127.0.0.1 secure.registeridm.com

127.0.0.1 internetdownloadmanager.com

127.0.0.1 www.internetdownloadmanager.com

127.0.0.1 secure.internetdownloadmanager.com

127.0.0.1 mirror.internetdownloadmanager.com

127.0.0.1 mirror2.internetdownloadmanager.com

⏩ After adding the codes above, save the notepad file and exit.

⏩ Start your Internet download manager to enable it convert to full version. When next you update your IDM, your registration will not expire.That means it will remain full version for life time and you can update it without any problem in future.


How To Run Android Apps On Google Chrome On Your PC


During Google I/O 2014 it was announced that Chrome OS would be getting limited Android app support, thanks to the creation of a new “App Runtime for Chrome” (aka ARC) that runs Android code at nearly native speeds via a sandboxed Dalvik VM. Since then, several Android apps have made their way over to Chrome OS, though the number is still quite low, coming in under 50. Of course, it’s only a matter of time before this situation improves. In order to make testing out Android apps easier than ever for developers, or even just everyday tinkerers for that matter, Google has now released a new tool called ARC Welder. The only shortcoming is that it allows only one app at a time.

Running Android Apps On Google Chrome

➡ Install ARC Welder.
Go to Chrome extension factory and simply add it to chrome. The file size is a bit over 100 mb in size so it will take some time to load and will also get installed to your chrome browser.


➡ After it gets installed, type chrome://apps in address bar of the browser. It will start showing Arc Welder app icon as shown in the picture below. Click on the icon.


Meanwhile you have to find Android apk of the app which you want to work in chrome. If you have that app installed on your phone, just use android apk extractor to extract apk. You can also try some android apk mirror sites but that’s not really recommended from security point of view.

➡ Add your APK through the interface as shown.


➡ Add the apk and in the next screen just leave the default settings as it is and click on launch app.


You're done!!

NOTE: Not all apps will play nicely with ARC Welder, and this really is meant more as a way for developers to test out and make changes to their apps in anticipation of bringing them to Chrome OS. What do you think, excited to see more developers bring over their apps to Chrome OS